

How To Fix Ethernet Unidentified Network Windows 10
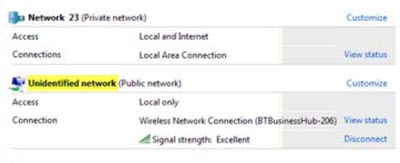
At times, you may face an issue with the network connectivity when trying to connect to the network, where the error says "Unidentified network". While no sure-shot solution is available for this, we have compiled an exhaustive list of troubleshooting steps that could help. Please go through the entire list first and then decide which of them may apply in your case.
Why does Windows 10 say unidentified network?
The Ethernet 'Unidentified Network' issue, usually, is caused due to the incorrect settings of the IP configuration or if the network settings are incorrectly set. Due to this error, Windows users are not able to use the internet on their systems even if they have a working internet connection.
How do I fix Unidentified Network in Windows 10?
To fix the issue of Unidentified Network in Windows 10/8/7, the following suggestions could be carried out.
- Turn off the Airplane mode
- Update the Network Card drivers
- Disable the security software temporarily
- Switch off the Fast Startup feature
- Change your DNS servers
- Run these commands
- Diagnose the network
- Change the Ethernet cable
- Set a static IP address
- Use an external Network Adapter
- Restart your modem and router
- Upgrade the router firmware
- Disable Virtual Network Adapters
- Run the built-in Network troubleshooters.
Let us see these methods in detail. Go through the entire list first and see what may apply in your case.
1: Turn off the Airplane mode
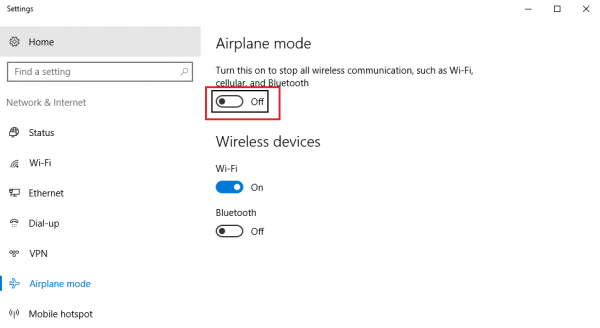
Windows 10 offers Airplane mode or Flight Mode if you need to disconnect from all the networks, including internet access. If it is turned off, you need to turn it on to resolve the problem. There are two ways to turn off the flight mode:
Windows 10 Settings: Tap on the Windows key and then click on the Settings icon. Then click on Network and Internet option. Then click on the Flight Mode option, and toggle it off.
Wifi/Network Icon:Disabling Flight mode is easy using the Wifi icon or Network icon on the taskbar. Right-click on the wifi icon and if the Flight Mode looks dark, tap on it, and it will be turned off.
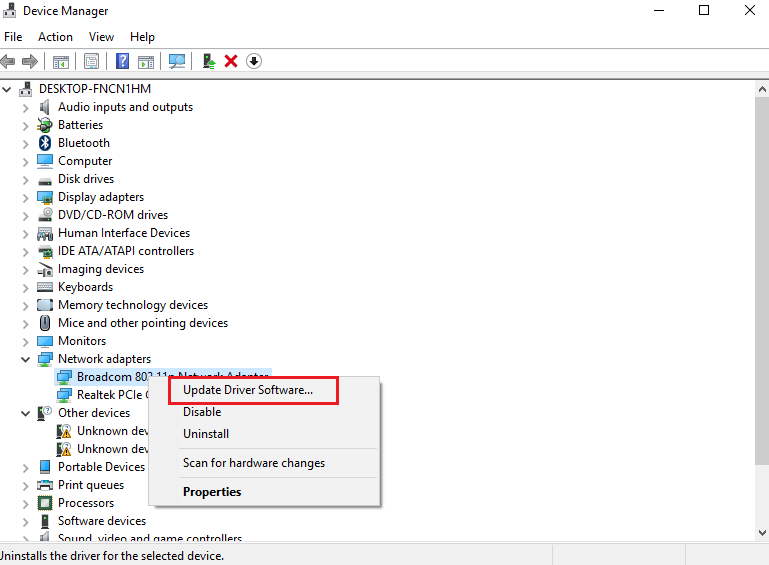
2: Update the Network Card drivers
Sometimes the issue might be with the Network drivers. Update them and see if this helps. To Update the Network Card Drivers, there are two options:
Windows Update: Go to Windows 10 Settings > Update and Security > Click on View Additional Update link. Check if there is an update available for the network driver. If yes, install it. Restart and check if the issue persists.
Download from OEM Website: Open Device Manager (Win + X followed by the M key), locate the network adaptor, and check click on the Properties option.
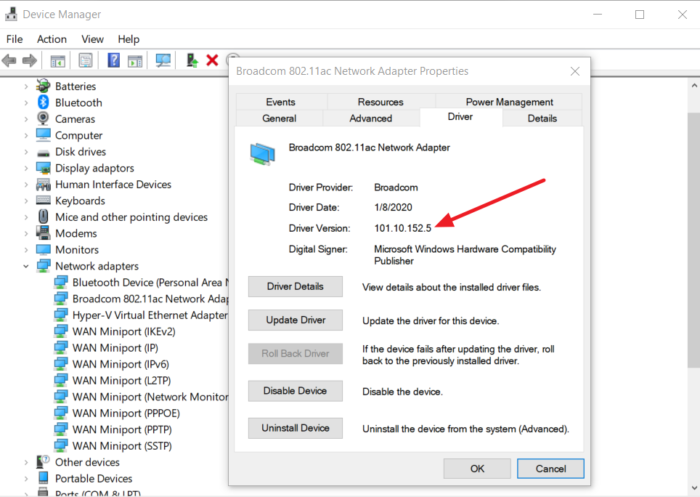
Switch to the Drivers tab, and Note the driver version. Next, open the Ethernet Adapters or Wifi Adaptor OEM website. Locate the driver's section, and check if there is a new version released. If yes, create a restore point on your computer, and then install the driver.
3: Disable the security software temporarily
Many times, anti-virus or firewall software interferes with the network connectivity or causes other issues. Understandably, anti-virus software is crucial for the system. Still, it could be disabled to check if the network connectivity issues resolve in its absence to isolate the issue.
Right-click on its system tray icon of the Security Software and see if you get an option to disable it. Once disabled, see if you can connect. If you use Windows Firewall, you may want to reset Windows Firewall settings to default and check. If you are using VPN software, disable it and try.
4: Switch off the Fast Startup feature
All of us have noticed that the later versions of Windows boot considerably faster than the previous versions. This is because of a feature called Fast Startup. Sometimes, this mode causes issues. To disable the feature, use the following steps:
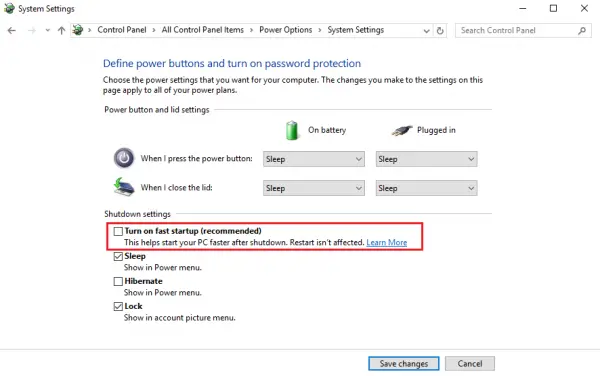
1] Search for 'Power Options' in the Windows search bar. Open the Power Options window and among the tabs on the left, click on Choose what the power button does.
2] Click on 'Change settings that are currently unavailable'.
3] Uncheck 'Turn on fast startup'. Shut down the system and reboot after 30 seconds.
Done that, check if the wireless connection or ethernet is restored, and you can connect to the internet as expected.
5: Change your DNS servers
ISPs offer their custom DNS server address which could be slow sometimes. You can instead choose Google Public DNS or Cloudflare DNS to speed up website access.
1] Press Windows + X or right-click on the start button.
2] Click on 'Network Connections'.
3] Right-click on your network connection (Ethernet or Wifi) and click on properties. It might prompt for administrator credentials.
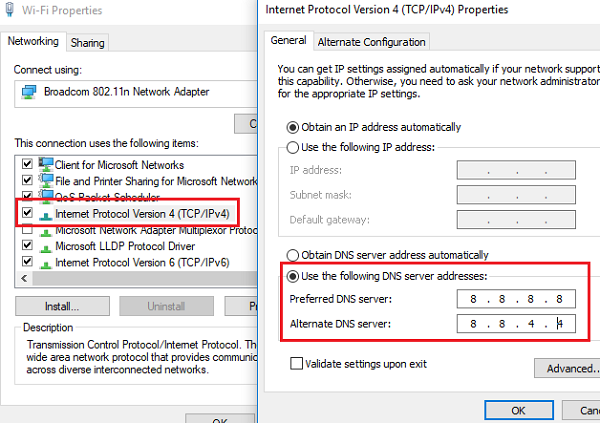
4] Double-click on Internet Protocol Version 4.
5] Select 'Use the following DNS server addresses and set but the preferred and alternate DNS server address as follows to use Google Public DNS:
- Preferred DNS server: 8.8.8.8
- Alternate DNS server: 8.8.4.4
6: Run these commands
Open the Command Prompt with admin privileges, and execute these commands. You can search it by typing 'command prompt' in the Windows search bar, and once it appears, choose to run it as administrator.
Type ipconfig commands one by one and restart the system. Basically, these commands – renew the IP address, reset Winsock, Flush DNS cache, and reset TCP/IP.
ipconfig /release ipconfig /renew netsh winsock reset netsh int ip reset ipconfig /flushdns ipconfig /registerdns netsh int tcp set heuristics disabled netsh int tcp set global autotuninglevel=disabled netsh int tcp set global rss=enabled netsh int tcp show global
7: Diagnose the network
Windows 10 offers a built-in network troubleshooter. You can find it in Troubleshoot section. You can execute it in two ways. The First method diagnoses a particular network adaptor, while the second method looks at everything.
Troubleshoot Particular Network Adaptor:
1] Press Windows + X or right-click on the start button.
2] Click on 'Network Connections'.
3] Right-click on your network connection (Ethernet or Wifi) and click on 'Diagnose'. It will start an automatic troubleshooter.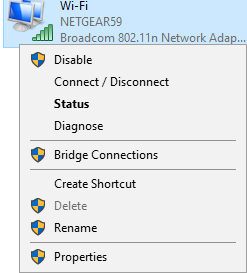
The second way to do this is to go to Windows 10 Settings > Update & Security > Troubleshoot > Additional troubleshooter. Locate Network Adapter, and choose to run it. Once done, check if the issue is resolved.
8: Change the Ethernet cable
At times, the fault might be with the ethernet cable. It can be an old cable that is now aging. If you do not have a WiFi adaptor, then change the ethernet cable to isolate the issue. Or else, try connecting to a Wifi network and check if it works.
9: Set a static IP address
Network Settings of an Ethernet or Wifi Adapter allow you to configure Static IP address. This comes in handy when your router or ISP fails to offer a dynamic IP address every time you connect to it.
1] Press Windows + X or right-click on the start button.
2] Click on 'Network Connections'.
3] Right-click on your network connection (Ethernet or Wifi) and click on properties. You have to enter the administrator credentials to confirm the changes.
4] Double-click on Internet Protocol Version 4.
5] Select the radio button at 'Use the following IP address'.
6] Check the IP address settings for others using the same network as yours and change your settings to the same.
7] Click OK to save the settings and exit.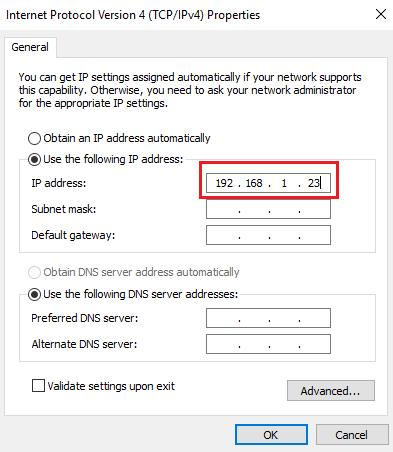
10: Use an external Network Adapter
To isolate if the issue is with the network adapter, try an external adapter and check if it resolves the problem. These external adaptors are present in most laptops and desktops and should work even if the internal one fails too, making this a good first step to isolate if the problem.
11: Restart your modem and router
Power cycling the adapter will often resolve the issue and is worth trying if you are certain that your laptop's network adapter is working properly and that the network itself is working properly.
1] Switch off both your modem and router, keeping them physically connected.
2] Start the modem. Wait for 30 seconds after all the lights turn green.
3] Start the router.
Some modern routers take a longer time to get into a stable mode, so make sure to take that into account.
12: Upgrade the router firmware
If all devices connected to the router are facing network issues, you might need to contact the router's tech support to help with upgrading the firmware of the device. If the router's OEM offers software, you can check that and a notification that can help you update the firmware.
13: Disable Virtual Network Adapters
Virtual Network Adapters are told by their Host Virtual Adapters that they are connected to a network through something called a Virtual Network Connection. They appear to same as the hardware adapters in Windows and follow the same set of guidelines and protocols for communication.
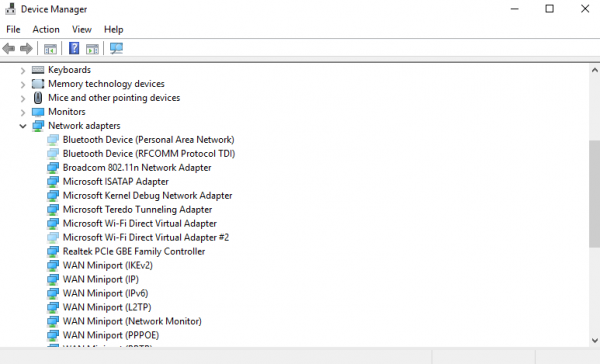
Once again, open the Device Manager and expand the Network Adapters section. In case Virtual Adapters are present, right-click and disable them. You can easily identify them as their names will carry the term virtual with them.
14: Run the built-in Network troubleshooters
To open Internet Connections Troubleshooter:
msdt.exe -id NetworkDiagnosticsWeb
To open the Incoming Connections Troubleshooter
msdt.exe -id NetworkDiagnosticsInbound
To open the Network Adapter Troubleshooter:
msdt.exe -id NetworkDiagnosticsNetworkAdapter
15. Change Adapter's Duplex
At times the unidentified network message appears because of the misconfigured or limiting Duplex settings. To change it, follow these steps:
Right-click on the Network icon on the taskbar and select Open Network and Internet settings. In the Network Status window, click on Change adapter options. This will reveal all the network adapters available with Windows 10 PC.
Right-click on the adapter that is causing the issue and select properties. In the Network Properties window. Click on the Configure button.
Then switch to the Advanced tab, and select Speed/Duplex from the list. Change it to Auto-negotiation if set to something else.
Note: We have noticed that this setting may not appear on every computer.
Why is my Internet unidentified network?
There are several common reasons that an Unidentified Network or Limited connection message may appear in your device's network adapter. This could happen in case your network card driver is old or corrupted. Incorrect Network settings could also prevent you from making a connection.
How do I change from an unidentified network to a home network?
The first option is to run the Network troubleshooter to check for problems that may be preventing you to change an unidentified network to Home Network. If that doesn't fix the problem, then, turn on network discovery. To do so, open Advanced Sharing Settings > Network and Sharing Center > Change Advanced Sharing Settings. Further, click on Turn on network discovery and then click Save changes.
If you are up for more troubleshooting, check some more suggestions to fix Network & Internet connection problem, and the Ethernet connection is not working in Windows 10.
I hope one of the solutions had helped you here to resolve the Unidentified Network in Windows 10 PC. These errors are known to be notorious and take a longer time to resolve.
How To Fix Ethernet Unidentified Network Windows 10
Source: https://www.thewindowsclub.com/fix-unidentified-network-windows
Posted by: goodsoncined1957.blogspot.com
0 Response to "How To Fix Ethernet Unidentified Network Windows 10"
Post a Comment